Build A Telegram ChatGPT Bot With Easegress
Before reading this article, please read the Multiple API Orchestration article to ensure an understanding of Easegress API orchestration and Telegram bot.
In this article, we will introduce how to build a Telegram ChatGPT bot with Easegress. This bot can generate a response based on the user’s input.
1. Prerequisites
Since the bot needs to receive Telegram message notifications and call ChatGPT APIs, we must prepare the following in advance:
- Install the latest version of Easegress according to this document and make sure that external applications can access the Easegress instance on at least one of ports 80, 88, 443, or 8443.
- Create a Telegram bot by following this document, set its name (EaseChatGPTBot is used in this article), write down its token, and set up a Webhook that points to the Easegress instance installed in the previous step. Our bot will receive notifications of new messages through this Webhook.
- Create a OpenAI account and write down its API key.
2. How it works
The diagram below shows the workflow of this bot:
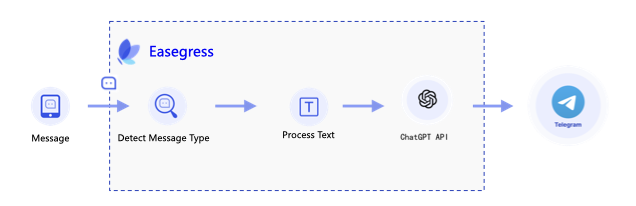
Upon receiving a notification of a new message from the Telegram server via webhook, the bot first checks the message type. If it is a text message, then call the ChatGPT API and send the response to the user via Telegram.
3. Pipeline
First, let’s check the overall flow of the Pipeline:
name: chatgpt-pipeline
kind: Pipeline

flow:
---
title: we put the final response builder at the top because Telegram requires
linkTitle: we put the final response builder at the top because Telegram requires
weight: 8
---
---
title: us to return a response for every Request, but we only process some of
linkTitle: us to return a response for every Request, but we only process some of
weight: 8
---
---
title: the requests. If we put it at the end, the requests we don't process
linkTitle: the requests. If we put it at the end, the requests we don't process
weight: 8
---
---
title: will end the process early and no Response will be returned.
linkTitle: will end the process early and no Response will be returned.
weight: 8
---
- filter: buildFinalResponse

---
title: check request type, only process text message
linkTitle: check request type, only process text message
weight: 8
---
- filter: checkRequestType
  jumpIf:
    result0: processText
    "": END                              # ignore, end the processing

---
title: process text message
linkTitle: process text message
weight: 8
---
- filter: requestBuilderExtractText
  alias: processText                     # alias of the filter
  namespace: extract                     # namespace the filter belongs to

---
title: send to ChatGPT
linkTitle: send to ChatGPT
weight: 8
---
- filter: requestBuilderChatGPT          # send request to ChatGPT
  alias: chatGPT
  namespace: gpt
- filter: proxyChatGPT
  namespace: gpt

---
title: send reply message to Telegram
linkTitle: send reply message to Telegram
weight: 8
---
- filter: requestBuilderReply            # constructing a request to send the reply
  namespace: tg
- filter: proxyTelegram                  # send the request to Telegram
  namespace: tg
4. Filter
4.1 Backend Proxies
We need to create two proxies to send requests to the ChatGPT API server and the Telegram API server. The configuration of the two proxies is as follows:
- name: proxyChatGPT
  kind: Proxy
  pools:
  - servers:
    - url: https://api.openai.com

- name: proxyTelegram
  kind: Proxy
  pools:
  - servers:
    - url: https://api.telegram.org
4.2 Check and Extract Text
The processing details are the same as that in Multiple API Orchestration.
filters:
- kind: ResultBuilder
  name: checkRequestType
  template: |
    {{- $msg := or .requests.DEFAULT.JSONBody.message .requests.DEFAULT.JSONBody.channel_post -}}
    {{- if $msg.text}}result0{{end -}}

- kind: RequestBuilder
  name: requestBuilderExtractText
  template: |
    {{- $msg := or .requests.DEFAULT.JSONBody.message .requests.DEFAULT.JSONBody.channel_post -}}
    body: |
      {
         "exclude": true,
         "text": "{{$msg.text | jsonEscape}}"
      }
4.3 Send Request to ChatGPT
Build a request to send to ChatGPT. See more details in OpenAI API. Make sure to replace the {Your OpenAI API Key} with your own API key.
- kind: RequestBuilder
  name: requestBuilderChatGPT
  template: |
    method: POST
    url: /v1/chat/completions
    headers:
      "Authorization": ["Bearer {Your OpenAI API Key}"]
      "Content-Type": ["application/json"]
    body: |
      {
         "model": "gpt-3.5-turbo",
         "messages": [{
            "role": "user",
            "content": "{{.requests.extract.JSONBody.text | jsonEscape}}"
         }]
      }
4.4 Send Reply Message to Telegram
Make sure to replace the {YOUR BOT TOKEN} with your own bot token.
- kind: RequestBuilder
  name: requestBuilderReply
  template: |
    {{$msg := or .requests.DEFAULT.JSONBody.message .requests.DEFAULT.JSONBody.channel_post}}
    {{$resp := index .responses.gpt.JSONBody.choices 0}}
    method: POST
    # Please replace it with the url of your bot
    url: https://api.telegram.org/bot{YOUR BOT TOKEN}/sendMessage
    headers:
      "Content-Type": ["application/json"]
    body: |
      {
        "chat_id": {{$msg.chat.id}},
        "reply_to_message_id": {{$msg.message_id}},
        "text": "{{$resp.message.content | jsonEscape}}"
      }
4.5 Response
Telegram requires us to return a response for each request. Since we don’t need to reply to messages via this response, we can simply set the status code to 200.
kind: ResponseBuilder
name: buildFinalResponse
template: |
    statusCode: 200
5. Deploy
Once we have prepared the configuration file (can be downloaded here), we can deploy this Pipeline to Easegress (assuming the file name is chatgpt-pipeline.yaml) via the following command.
$ egctl create -f chatgpt-pipeline.yaml
Create a HTTPServer to receive the webhook from Telegram.
$ echo '
kind: HTTPServer
name: httpserver
port: 8443           # telegram requires the port to be 80, 88, 443 or 8443
https: true
autoCert: true       # please set it to false if you are not using an AutoCertManager
keepAlive: true
keepAliveTimeout: 75s
maxConnection: 10240
cacheSize: 0
rules:
- paths:
  - path: /chatgpt
    backend: chatgpt-pipeline' | egctl create -f -
Now, we can test the bot in the chat.